How To Repair A Pokies Machine?
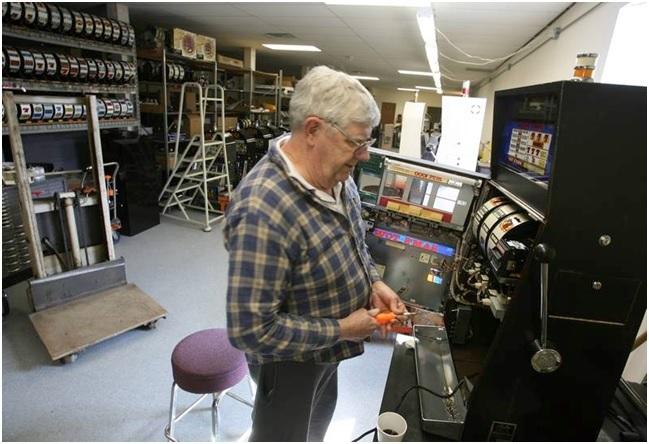
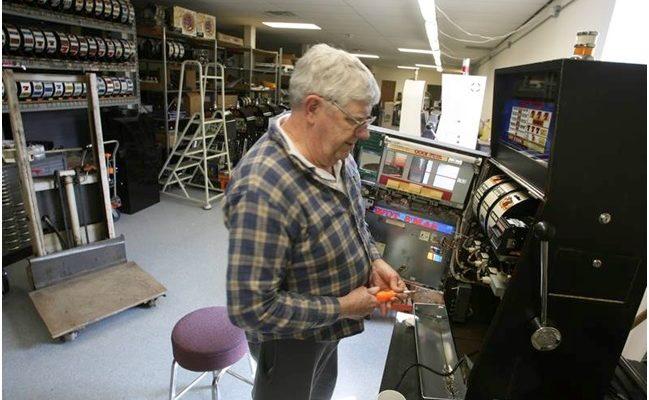
If you have a pokies machine or you have bought one old used vintage pokies machine and want to have some fixes to get it work then obviously you will think you need a machine technician. Many of you will even think of taking it to some repair station to get things done. But here in the guide you will find some of the repairs that you yourself can do with your pokies machine and you need not need to join machine technical repair training school.
Like any other machines Pokies machines too are a blend of electronic and mechanical components, that wear with age and require routine repairs. Before you begin to repair yourself do note that every pokies machine that you have purchased whether old or new comes with installation and user guide manual. You need to read that many a times until you are familiar with each components and parts of the pokies machine and understand thoroughly as how the pokies machine works.
How to repair a pokies machine?
Here to repair pokies machines you will find some common repairs that can be carries out by you, some videos to watch as well. If your pokies machine has some complex issue then obviously you require a qualified technician.
1. Changing the Top Florescent Light
The top florescent light bulb is easily changed by following these simple procedures. The replacement bulb is an F15T8/CW 18″ 15 Watt bulb which is available at most hardware and department stores or may be purchased online at Ebay or Amazon or pokiesforsale under the category ‘parts of pokies machine’.
Open the main pokies machine door and ensure the door is fully open. Turn off the power to the pokies machine. The power switch can be found with the main door open about midway down on the right side just inside the machine.
If the machine is equipped with a top ticket printer, you must pull the bottom of the printer out far enough to see where the ticket paper is located, and note the area large enough to place a couple of your left fingers under.

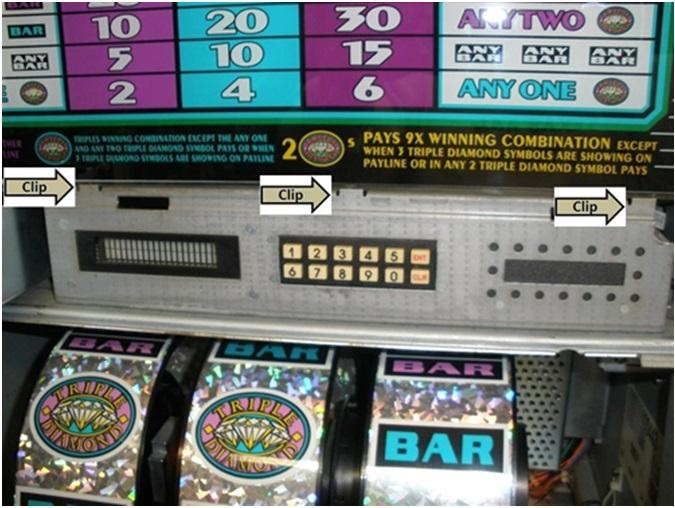
Remove the top metal trim strip which is a cover plate to the right of the ticket printer and/or is located along the bottom of the top glass. There are a couple of clips on the back of the metal trim strip that fit into notches on metal bracket which holds the top glass. The metal trim strip should be lifted upwards and outwards to remove.
Once the metal trim strip is removed, the next step is to remove the top glass. Note that some top metal trim strips have a pokies in the top that holds the top glass and they must be removed very carefully as to not damage or drop the top glass.
You can now see the top glass is held in place by usually two or three clips that rise above the metal bracket behind the top metal trim strip. Now slowly lift up on the top glass from both bottom edges until the top glass until it is high enough to gently pull it forward and allowing it to slide down and away from the top track and clips holding it in place.
Once the top glass has been removed, put it somewhere where it will not get knocked over or broken. You will see the florescent bulb in the middle of the top box area of the machine. Care should be taken removing the bulb as it may be very hot. Remove the old bulb by twisting the florescent tube about a quarter to half turn allowing the two prongs on the bulb to slide out of the fixture on both sides of the bulb.
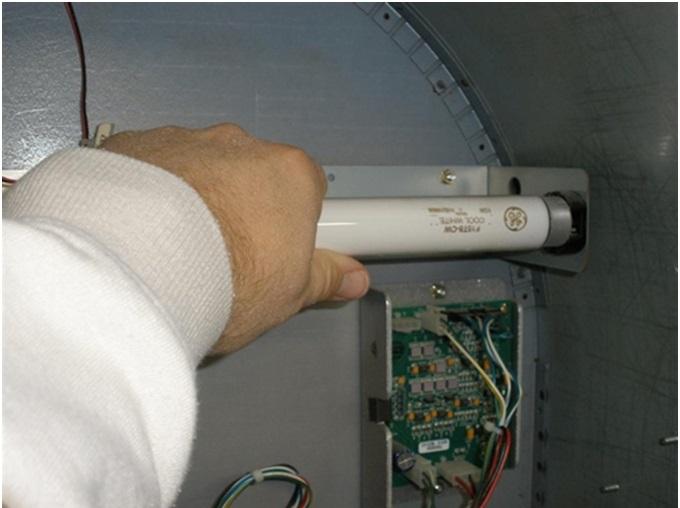
Remove and discard the old bulb. To install the new bulb, align the two prongs on each side of the florescent tube with the slits on each fixture in the top box of the pokies machine. Twist the bulb into place normally using about a quarter to half of a turn. If the bulb is not secure or aligned, repeat the procedure.
If your pokies machine is an IGT S Plus machine, it is equipped with a florescent bulb starter. Then you can replace the starter when replacing the florescent light bulb. The starter is an FS-U Universal Starter. They are available at most hardware and department stores or may be ordered online too. The starter for the top florescent bulb on an IGT S Plus machine is located directly behind the florescent bulb fixture on the left side of the pokies machine in the top box area.
It is replaced by twisting about a quarter to half a turn as it is held in place with a bayonet type mount. Remove the old starter and discard. Replace with a new FS-U Universal Starter by aligning the two pins on the bottom of the starter with the notches in the starter receptacle, pushing it up into the starter socket, and then twisting it a quarter to half a turn into place.
Prior to re-installing the top glass, turn the power switch on the right inside of the machine on to verify the bulb works properly. If it does not, turn the power off and check that the bulb is properly installed and secure. If replacing a starter, check that it is also properly installed and secure.
After verifying the bulb is working, it is now time to replace the top glass. If your pokies machine has a top ticket printer, ensure the ticket printer is still pulled out so you can place your fingers in the opening while replacing the top glass.
Carefully and slowly lift up the top glass placing each hand under the bottom of the top glass. Slide it into the upper edge track on the top box of the pokies machine carefully lifting it so it slides into the tracks while being able to push the top glass back far enough to clear the two or three raised clips on the metal bracket where the top glass holding track is located.
Gently and slowly lower the top glass behind the clips so as to allow them to hold the glass in place. If properly secured, the top glass will not be able to slide down or out of its position. Keep a secure hold on the top glass until you are certain it is secured in the proper position.
Replace the top metal trim strip by aligning the two or three hooks the back through the metal bracket that supports and holds the top glass. Once the hooks on the back are in place, gently push the top metal trim strip down and it should snap into place. If you have a pokies machine with a top ticket printer, close it tight into position. Close the main pokies machine door and you are ready to play.
2. Changing the Belly Glass Florescent Light
The belly glass florescent light bulb is easily changed by following these simple procedures. The replacement bulb is an F15T8/CW 18″ 15 Watt bulb which is available at most hardware and department stores or may be bought online as spare parts of pokies machine.
Open the main pokies machine door. Turn off the power to the pokies machine. The power switch can be found with the main door open about midway down on the right side just inside the machine.
Facing the pokies machine door, look on the right side of the door just around from bill acceptor area. You will see a knob sticking out that is approximately the size of the end of a regular pencil. This knob when pulled out releases the pokies machine belly glass assembly (belly door) to fold down so the bulb can be accessed.
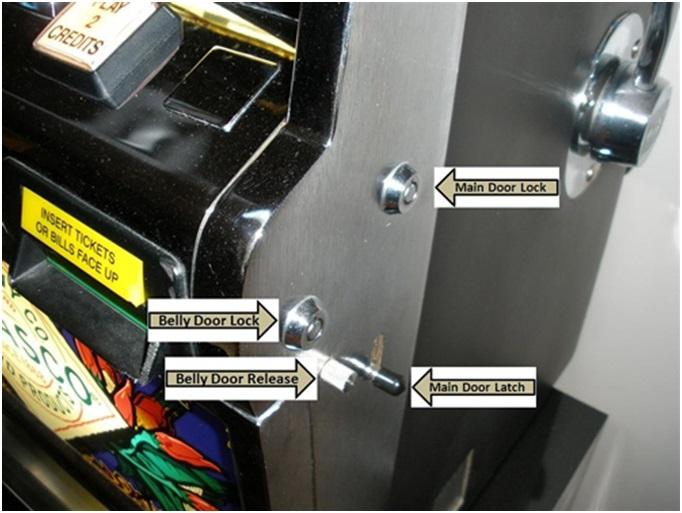
There are a couple of very important thing to remember prior to pulling this knob to release the belly door. First try pulling gently on the knob. If it does not allow you to pull out and you have a lock installed directly above it, the lock must unlocked in order to allow the release knob to pull out. When pulling out the release knob, be ready for the belly door to fold down.
Most of the time you must lightly pull on both sides of the belly door to get it to fold down, however always place your hand under it so it does not fall down too quickly causing the belly glass to break or crack.
Once the belly door is in the down position, you will see the access to the florescent bulb bracket that is held in place by a small Phillips screw. Remove the screw and place it the coin tray so it will be handy when you need it after replacing the bulb.
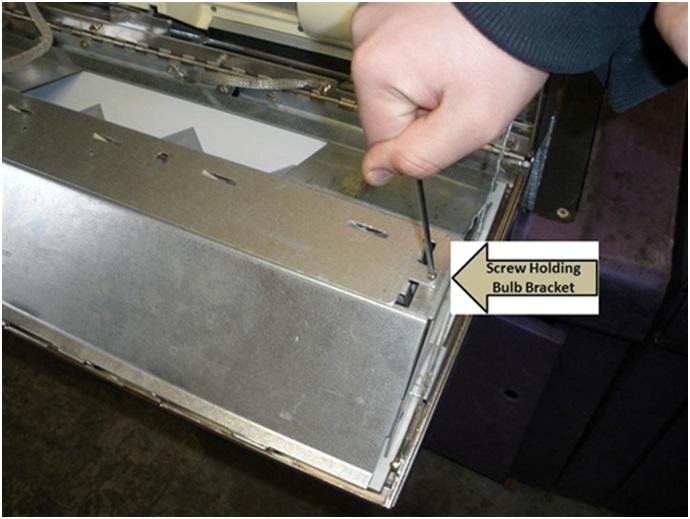
The long metal bracket that holds the florescent bulb must be slid slightly right or left so as to be able to lift it out of the belly door. Gently lift the metal bracket with florescent bulb out of the assembly far to be able to turn it over to replace the bulb. Be cautious as the bulb could still be hot!
Grasp the metal bracket holding the florescent bulb and remove the old bulb by twisting the florescent tube about a quarter to half turn allowing the two prongs on the bulb to slide out of the fixture on both sides of the bulb.
Remove and discard the old bulb.To install the new bulb, align the two prongs on each side of the florescent tube with the slits on each fixture that is on each side of the new bulb. Twist the bulb into place normally using about a quarter to half of a turn. If the bulb is not secure or aligned, repeat the procedure.
Now turn the metal bracket that holds the newly installed bulb over and back into position in the belly glass assembly. Slid the bracket slightly right or left into position and replace the small screw which holds the metal bracket in place.
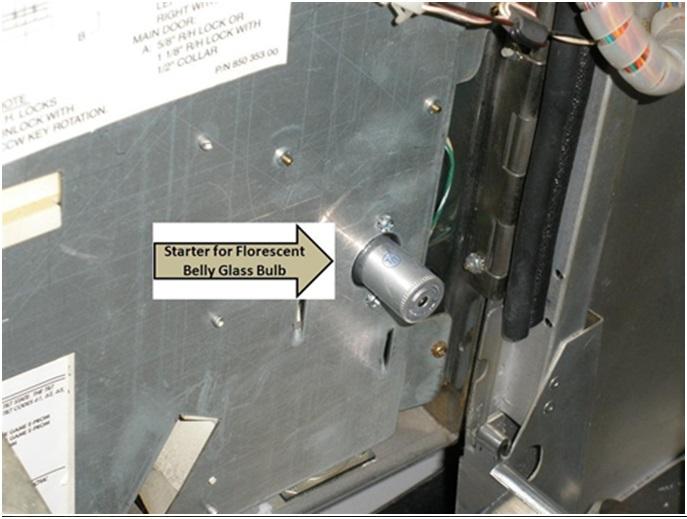
If your pokies machine is an IGT S Plus machine, it is equipped with a florescent bulb starter. So you need to replace the starter a well when replacing the florescent light bulb. The starter is an FS-U Universal Starter. They are available online and you can purchase one.
The starter for the belly glass florescent bulb is located on the back of the main pokies machine door on the lower right hand corner as you face the back of the door.
It is replaced by twisting about a quarter to half a turn as it is held in place with a bayonet type mount. Remove the old starter and discard. Replace with a new FS-U Universal Starter by aligned the two notches on the bottom of the starter, pushing it into the starter socket, and then twisting it a quarter to half a turn into place.
Prior to closing the belly glass door, turn the power switch on the right inside of the machine on to verify the bulb works properly. If it does not, turn the power off and check that the bulb is properly installed and secure. Also check to ensure the starter is properly installed and secured.
Lift the belly glass assembly up and push it into place in the pokies machine door. Ensure the belly glass door snaps into place and the knob on the side of the door is in its normal position. It is spring loaded so as to not allow the belly glass assembly to open unless it pulled. If the belly door appears to be in place, pull on both sides of the belly door to make sure it is locked and secure.
If you unlocked the lock above the knob, re-lock it. Close the main pokies machine door and you are ready to use your pokies machine.
3. Changing the Push Button Bulbs
All of the pokies machine’s push button lights such Play Max Credits, Spin Reels, Bet One Credit, etc. are easily replaced by following this simple procedure. The replacement bulbs are #161 on IGT S2000 machines and #555 on IGT S+ machines and may be purchased from online stores.
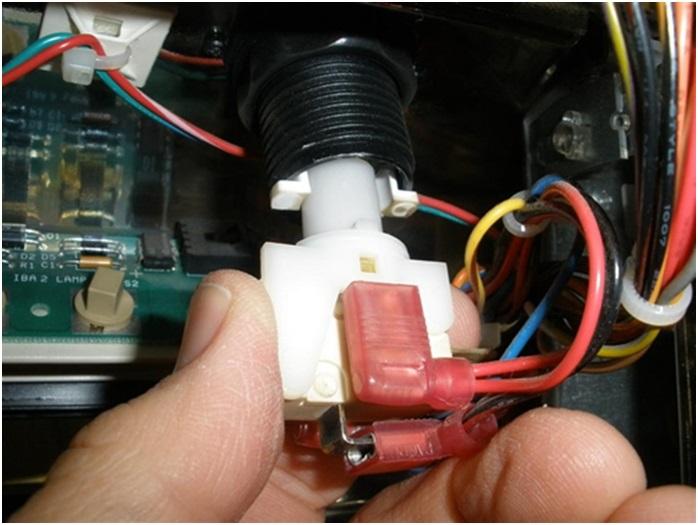
Fully open the pokies machine door. Look on the backside of the door. Each push button will extend down from the shelf on the door and will have a small wire bundle going to it. Identify which push button bulb needs to be replaced.
Carefully pull down on the bottom of the push button area that is normally white and is where you will see wiring connected. Using your thumb and two fingers, pull straight down and the bottom portion of the push button should snap out.
You will now be able to see the bulb in the top area of the lower push button assembly. Use caution as the bulb may be very hot. Pull the wedge bulb out and discard it. Notice the pokies in which the bulb located.
Place a new bulb in the pokies noting the direction of pokies ensuring the new wedge bulb is inserted so as to line up in the pokies. Push the new bulb into place.
Replace the bottom of the push button assembly by inserting it into the top portion of the push button assembly. The bottom portion will snap into position. Ensure that none of the wire connections have been accidentally knocked loose on the bottom of the push button. Note the push button light will not illuminate until the pokies machine door is closed. Close the main pokies machine door and you are ready to play.
4. Changing the Small Panel Lights
The small panel lights that illuminate the denomination amount and other areas behind the glass are easily changed. For denomination amount lights on the IGT S2000, a #73 bulb is needed and a #86 bulb is needed on the IGT S+ pokies machines. They may be bought online from pokies machine selling sites.
Here it is described as how to change the lights behind denomination amounts such as .25 Cents. Other small panel light bulbs are changed in the same manner.
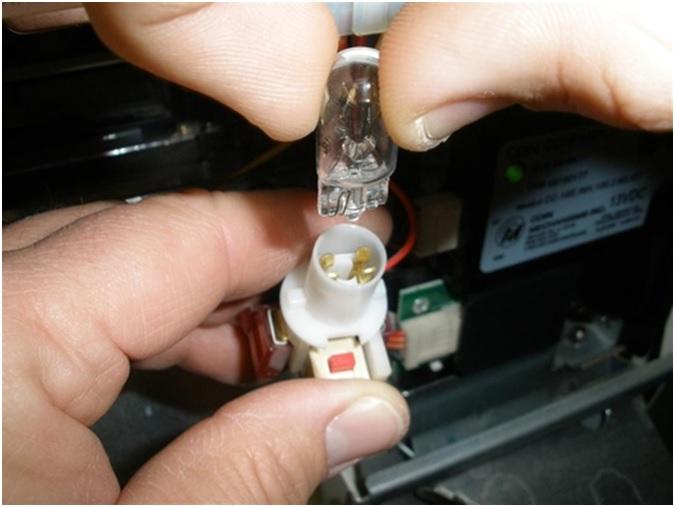
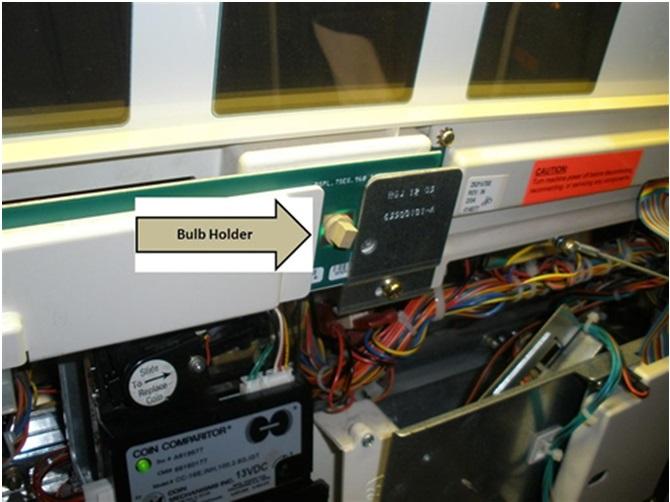
Fully open the pokies machine door. Look on the backside of the door. Note the location where the denomination amount would be located near the center just below the pokies machine’s center glass. The area will appear to be flat with a small bulb holder projecting out that is slightly larger in diameter than a regular pencil and is flat on two or four sides.
This bulb holder is removed by simply twisting it a quarter to half a turn and then gently pulling it out of its socket. It is held in place by somewhat of a bayonet type mount.
Once the bulb holder is removed, pull the wedge bulb out of the socket and discard the old bulb. Caution should be taken as the old bulb may be very hot. Replace the bulb by firmly inserting a new bulb into the socket of the bulb holder being careful to align the wedge bulb correctly into the pokies.
Take the bulb holder and look for two notches on each side of the opening where the bulb holder is inserted. Note there are two notches on the bulb holder. Align the notches inserting the bulb holder into the panel.
Gently twist the bulb holder about a quarter to half a turn to lock it into place. Verify the bulb is illuminating, and if not repeat the procedure using a different new bulb. Now close the main pokies machine door and ready to use.
5. Cleaning Your Pokies Machine
This is common thing and all you need is usually nothing more than a damp cloth to clean the exterior cabinet of your pokies machine. Never use any abrasive or ammonia based cleaners on the cabinet of the machine.
The pokies machine top, center and belly glasses may all be cleaned on the outside by using a window cleaner. However if you own a pokies machine with a frosted exterior glass or one that has any exterior decorated markings such as stars, a window cleaner should not be used as the cleaner may damage the exterior images. Care should be taken cleaning interior glass as a cleaner and cloth may damage labels or markings.
The inside of the pokies machine should not require cleaning other than occasionally removing dust. This can normally be done with a damp clean cloth, however ensure the power switch has been turned off prior to cleaning.
When wiping dust inside your machine, be careful not to loosen any wires or connections. Do not use a damp cloth on the face of your reel strips as the playing symbols on the reel strips could come off or become torn. Also be very careful not to touch the back side of your reel strips with a damp cloth especially if the back sides of the reel strips are black. This can cause damage to this type reel strip.
When your Pokies Machine Doesn’t Power On
When you get a pokies machine and wish to locate or set up at your place, determine the household 120V AC outlet you are planning to use has power. Keep in mind some outlets are controlled on and off by a wall switch.
With the pokies machine unplugged from the outlet and surge protector, open the pokies machine main door. Remove the coin tray by lifting up and pulling out the tray. Simply pull it out and down to remove the tray.
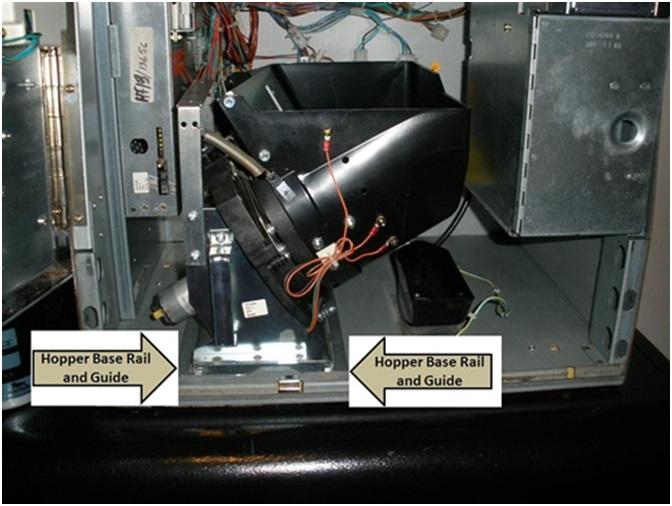
The hopper is on the bottom floor of the machine and slides out on two base rails along two metal guides. Slide the hopper out slowly by grasping the handle with your left hand and supporting the hopper with your right hand. Do not use the black hopper bowl to pull the hopper out of the pokies machine.
On the lower right corner of the pokies machine you should see the black power cord coming into the machine. The power cord plugs into the Power Distribution Unit which is located on the back wall of the pokies machine.
Verify the power cord is firmly plugged into place into the right side of the Power Distribution Unit.
Place the hopper back into the pokies machine making sure it slides in easily and completely with the base rails on hopper guides on the bottom of the machine. The hopper plugs into a receptacle toward the back of the machine. It is designed to fit in easily without using excessive force.
The coin tray can be easily put back into place by ensuring the alignment pins on the coin tray match up to the top alignment holes on the bottom side of the machine. The tray should be pushed down into place. Make sure the tray is even when pushed into place. If the coin tray is not aligned and even, remove the coin tray, and repeat the procedure.
Verify the power cord is firmly plugged into a good surge protector. Plug the end of surge protector into the outlet you have verified is good, and make sure the on/off switch on the surge protector is turned on.
Now turn the power switch on the inside right of the pokies machine to the on position and verify the pokies machine is powered on by lights illuminating.
Jackpot Payout
When your pokies machine just hit a 25,000 credit Jackpot it now needs to be reset to continue playing.
Depending on the model pokies machine you have and the amount of the payout will determine the best course of action.
If you have an IGT S+ Pokies Machine and your win is under the maximum payout amount specified on the center glass of the machine, the hopper may run out of coins or tokens. This is normally displayed by Error Code 3300. In this case it usually a simple matter of taking the coins or tokens that have been paid out and putting them back in the hopper allowing it to fully pay out. However, if you won a large jackpot that is “hand pay out”, then follow the steps below.
First open the main pokies machine door. Locate the Jackpot Key which is normally kept inside the pokies machine in a plastic envelope on the side of the cash box. If you do not find it inside the machine, often times the Jackpot Key will be strapped with the main pokies machine door key. It is a small key as pictured below.
Take the key in hand and locate the jackpot reset which is a keyhole located on the right side of the pokies machine. It is normally about two-thirds up from the bottom of the machine.
Insert the Jackpot Reset Key into the keyhole. Turn the key only one quarter turn to the right. This will reset the machine, and once you close the main pokies machine door, you will be ready to resume play.
Note that if you turn the Jackpot reset key multiple times you may place your pokies machine into a test mode and will thus delay your ability to continue playing.
Some of the Error Codes you get on Pokies Machine
1. Error Code 3300 (IGT S+ Machines)
Simply put Error Code 3300 is normally telling you your hopper is low on or completely out of coins or tokens.
Open the main pokies machine door. Look into the hopper. If it is empty or has just a few coins or tokens, place about 500 coins or tokens back into the hopper. Close the main pokies machine door. In a few moments you should hear the sound of the hopper’s motor turning and soon the remaining coin payout will begin.
2. Error Code 3100 (IGT S+ Machines)
Error Code 3100 (Extra Coin Out Tilt) normally signifies either a jammed/stuck coin or token in the coin-out chute on the hopper, or the hopper coin-out sensor has detected the hopper may have paid out an extra coin.
Open the main pokies machine door. Remove the coin tray by lifting up and pulling out the tray. Simply pull it out and down to remove the tray.
The hopper is on the bottom floor of the machine and slides out on two base rails along two metal guides. Slide the hopper out slowly by grasping the handle with your left hand and supporting the hopper with your right hand. Do not use the black hopper bowl to pull the hopper out of the pokies machine.
Inspect the hopper to determine if any coins/tokens appear to stuck or jammed in the hopper knife or the hopper coin-out channel.
If a coin appears to be stuck or jammed, empty the hopper of coins/tokens for easier access to clearing the jammed coin/token.
Once the stuck or jammed coin has been removed, place the hopper back into the pokies machine making sure it slides in easily and completely with the base rails on hopper guides on the bottom of the machine. The hopper plugs into a receptacle toward the back of the machine. It is designed to fit in easily without using excessive force
Refill the hopper with the proper size coins or tokens. The coin tray can be easily put back into place by ensuring the alignment pins on the coin tray match up to the top alignment holes on the bottom side of the machine. The tray should be pushed down into place. Make sure the tray is even when pushed into place. If the coin tray is not aligned and even, remove the coin tray, and repeat the procedure.
Close the main pokies machine door. The error code should be gone and the machine is ready to play.
3. Error Code 12 (IGT S+ Machines)
The 3.6 volt battery on the pokies machine CPU Board normally lasts for years. However when an Error Code 12 is displayed, this is an indication the battery voltage has dropped below 2.9 volts and is now a low battery.
It is recommended to replace the battery as soon as possible. They can be purchased online from ebay, amazon. When ordering a replacement battery, they will provide you with detailed instructions on how to change this battery which is located on the pokies machine’s CPU Board.
In order to reset Error Code 12 temporarily, simply open and close the main pokies machine door.
It is important not to wait for a long time to replace the battery as data stored on the RAM may be lost. Replace the battery Asap.
Following are some of the other error codes that might interest you to solve your problem in repairing the pokies machine
Error Codes
| CODE | DESCRIPTION | PROBLEM |
| 12 | Low Battery | Battery voltage on processor board has dropped below 2.9 volts DC |
| 21 | Coin-In Tilt | Optic coin-in sensors were blocked |
| 3100 | Extra Coin Out | Stuck/jammed coin in hopper or optic sensor detects extra coin paid |
| 3200 | Coin-Out Tilt | Hopper coin-out sensor was blocked |
| 3300 | Hopper Empty | Hopper coin-out sensor sensor detects no coins were dispensed for 8 seconds or more. Hopper needs to be refilled with coins/tokens. |
| 41 | Reel #1 | Tilt Designated reel is misaligned or malfunctioning |
| 42 | Reel # 2 Tilt | Designated reel is misaligned or malfunctioning |
| 43 | Reel #3 | Tilt Designated reel is misaligned or malfunctioning |
| 44 | Reel #4 | Tilt Designated reel is misaligned or malfunctioning |
| 45 | Reel #5 Tilt | Designated reel is misaligned or malfunctioning |
| 49 | Reel Mechanism Disconnected | A reel mechanism has become unplugged or the circuit is interrupted |
| 61 | CMOS RAM | Bad CMOS RAM data or data was cleared |
| 62-0 | Bad Game EPROM | Game program or data program check |
| 62-1 | Bad Data EPROM | Bad EPROM data |
| 63 | Processor Tray Open | Main processor door has been opened and closed since last game played |
| 65-0 | Bad EEPROM Device | Processor could not successfully read from or write to chip |
| 65-1 | Bad EEPROM Data | Data is invalid or corrupted |
| 65-2 | Game Type Mismatch | Game data om CMOS RAM does not match game data in EEPROM |
| 66 | Game EPROM Changed | Machine senses the game EPROM has been changed |
| 67 | Data EPROM Changed | Machine senses the data EPROM has been changed |
| 68 | Non-Compatible Data EPROM | Data EPROM is not a standard file |
| 99-1 | Bill Validator | Stacker jam |
| 99-2 | Bill Validator | Cash box removed |
| 99-4 | Bill Validator | Cash box full |
| 99-5 | Bill Validator | Hardware error |
| 99-6 | Bill Validator | Reverse bill detected |
Hopper is Full and Coins Go Down a Chute to Bottom of Machine
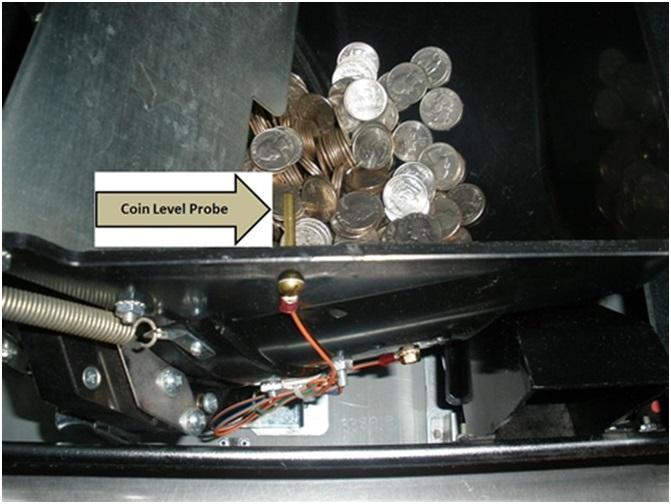
Pokies machines that accept coins were designed this way because when used constantly on the casino floor, hoppers could quickly fill. There is a coin level probe on side of the hopper that looks like a brass screw sticking inward toward the hopper bowl. This probe detects when coins/tokens are at a selected level, and will cause the subsequent coins/tokens played to go down a chute to the bottom of the pokies machine.
Provided your pokies machine sets on a regular casino pokies machine stand with holes in the top and the holes are aligned with the pokies machine, those coins which bypassed the hopper will go down the chute, through the hole in the bottom of the machine, through the hole in the top of the stand, and into the open area in the stand cabinet. As casinos have done for years, place a small plastic tub in the pokies machine stand cabinet to collect these excess coins.
How to retrieve currency from the Cash Box?
Though not all pokies machines are equipped to accept currency in order to comply with certain laws but if your pokies machine is equipped with a bill acceptor, bill transport and cash box, the bills in the cash box can easily be retrieved.
Open the pokies machine main door. The cash box door is located just under the yellow chute for the bill acceptor. Ensure the cash box door is fully open.
On the right side of the cash box toward the top is a release level. Push release lever down and pull the cash box straight out toward you. If the cash box seems difficult or impossible to pull out, make sure you have pushed the release lever down.
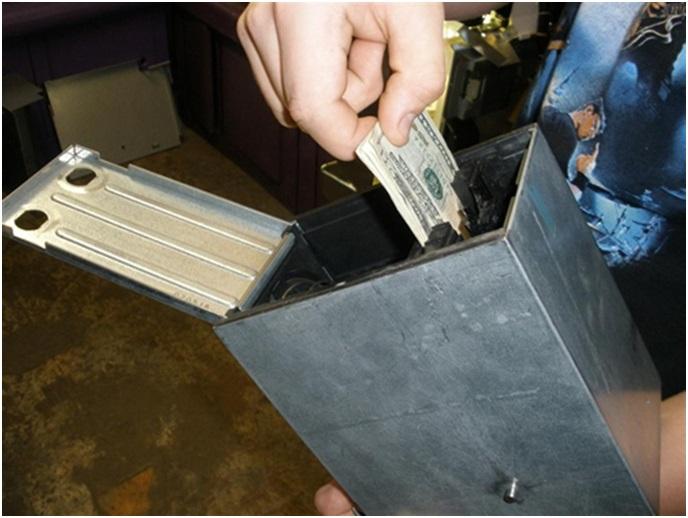
Hold the cash box in both hands and turn it upside down. Notice on the bottom of the cash box is a door which has two small finger sized holes on one side. Normally the door is held closed by a small piece of electrical tape so the bottom cash box door doesn’t come open while removing it from the cash box chassis of the pokies machine.
While holding the cash box with the bottom door up toward you, open the door and you will see where the bills are stored. The large spring expands as more and more bills are added to the cash box. Remove the bills by pulling them straight out.
Close the bottom door of the cash box and re-secure the door using the same small piece of electrical tape. Turn the cash box around to the original position when you removed it from the pokies machine.
Align the flat top of the cash box with the flat surface at the top of the cash box chassis from which you removed it. Slide it firmly into place. Now close the cash box door and the main pokies machine door and you are ready to use it for gaming.
All the content and videos in this post have been gathered by research for you from various online sources and hope this helps you as a guide to repair your pokies machines.
Changing the battery packs for the electronics, for example, is a common repair that pokies machine owners encounter on a regular basis.
- Locate the CPU board. It will be behind the hopper. Pull the black knob to remove the board.
- Remove the old battery pack and solder the new one in place. Use a soldering iron to heat the solder, turning it into a liquid state so that you can work with the packs freely.
- Locate the game prom socket and install an IGT clear chip. This chip clears the pokies machine memory. Run the clear chip by switching on the machine. Watch the displays running numbers. When the cycle completes, switch off the pokies machine and remove the clear chip.
- Install the set chip in the game prom socket. This chip resets the pokies machine’s bill validator. Turn on the pokies machine. When the bill validator reads “9,” “9 0” and “9 1”, you will know that the set chip has updated the validator. Turn off the machine and remove the chip.
- Install the original game chip. You will still get error messages at this stage because of the clear and set chips. This is normal. Press the test button and hold it until the error messages disappear.
- Replace everything as it was before and turn the reset key on. Close the outer casing of the machine and lock the cover. Now when you turn on the machine, you will get the “insert coin” message.